Pulling the Engine: Last Steps

Well, it was a night of victory, capped off with a terrible defeat. I removed the speedometer cable and the left front damper fork, but the right one was a different story. The bottom fork bolt came out OK, but the 14mm pinch bolt at the top just snapped right off. I joined the Broken Bolt Club tonight.

Here’s a picture of the damper fork I was able to remove.   The one stuck on the right side has a broken bolt where you see the left “pinch bolt” on this one:

An act of random social media brought an old acquaintance into my life.  He runs a small auto repair shop out west.

So this broken bolt is the 14mm pinch bolt at the top of the right front damper fork.  He says to ream out the broken bolt and put a new bolt/nut combo in there, but since it’s a learning experience I’m going to be stubborn and drill the thing out, and try to put a replacement bolt in there.

The Neglected Blog

I’ve neglected the project blog page.  It has become most convenient to just take some video with the iPhone, edit it, and shoot it up to YouTube and throw a Facebook post up.  That’s all fine and dandy if you’re my “friend” and are interested in the car.

So far, there have been four video updates.  Here they are, and I’m going to add some permalink stuff up top for them at some point:

Update 1: Where I fail to remove the fuel filter and play around finding the pistons.

Update 2: Where I finally remove the fuel filter and long-winded-ly talk about other stuff.

Update 3:  The Uncle Trace edition, where we stay up way too late and take off the A/C compressor, exhaust, and other stuff.

Update 4:  Now we try to take the rest of the harness and vacuum lines off.

This blog needs to serve as the focus of the rebuild effort.  I have failed to do that.  It’s late and I need to be sleeping right now, but detailed write-ups of what’s been going on shall be posted here soon.

  • Radiator out, it’s not the original radiator and will be replaced
  • All fluids (except brake) drained
  • Fuel filter out
  • Air box, hoses, and resonator out
  • A/C compressor out
  • Exhaust system is removed

I’m working right now to document and remove all of the harness and vacuum connections, then onto the clutch cable, and transmission linkages, pull the axles, and then we’re ready to remove the engine.

Radiator Removal Epilog

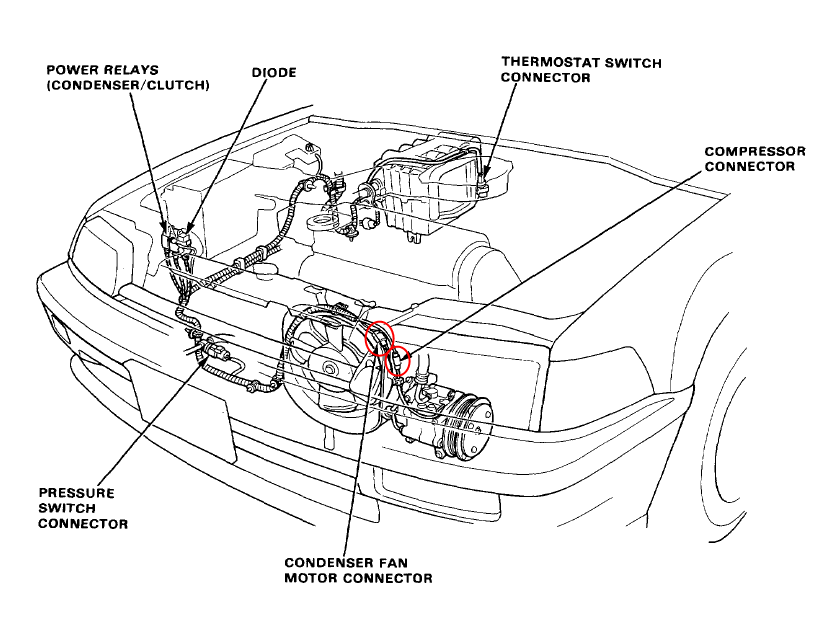
It turns out that the shop manual does have all the details, if you know where to look.  The radiator fan power connector is on the right side of the car, underneath the radiator.

The fan on the left side, by the coolant overflow reservoir, is indeed the A/C condenser fan, and the two connectors attached to it are the “compressor connector”, and the “condenser fan motor connector”. The compressor connector is routing the A/C relay lines from the other side of the car by the air box.

I’m guessing, without having the car in front of me, that both fan motor connectors are the green barrel type, and the compressor connector is the rubber-booted one.

Radiator Removal: The Final Act

I finally pulled the radiator tonight, and it was pretty ugly.

Untitled

The thing had all kinds of interference trying to get it out, namely the oxygen sensor, and a whole bunch of parts over on the right side where the A/C compressor was.

I punted to the CRXCommunity forums, in this post.  Thankfully, “warbird” clued me in to something with his statement:

“Removing the fan and shroud from the radiator will give you more room to wiggle the radiator around. Also the headers take up a little more room than the stock exhaust did, but you should still be able to get the radiator out.”


Ah hah!  I don’t have the OEM exhaust manifold/headers. “warbird”‘s post clicked the light on in my head. I had thought that perhaps this is a symptom of subtle front end damage, since everything seemed really tight and unnaturally close together.

Untitled

That makes sense, because I was wondering why they were missing the heat shield and were not the shape I was seeing in the shop manual.  This is an aftermarket non-OEM header, which explains why the oxygen sensor is where it is and there’s a very tight fit. I’ll be looking for an OEM exhaust header to replace this. Chalk it up to me being a completely fresh novice.

Back out into the garage and start taking the radiator fan off.  I’ve got two fans in there, and the shop manual has no mention of the second fan.  I’m discovering that the shop manual leaves a lot of details out, which is what anyone who is experienced working on these things probably knows very well already.

The fasteners that hold the fan onto the radiator are these weird captive bolts, and the first one came out easily.  Of course, the second one did not.  I ended up breaking my first part on the car:  one of the little plastic brackets that holds the fan onto the top radiator tank.

Untitled

At first it was very irritating, but very soon I won’t be as concerned, as you shall see.

The radiator finally came most of the way out after removing the first fan and shroud, but was still hanging up on “something”.  That something turned out to be the little stub lines sticking out of the bottom.  I don’t even know what their purpose is, but the right one was hanging up on an A/C line underneath.  A little coercion with my prybar on the line (gently), and I worked the little stub free and that was that.

Untitled

The only thing left to do was to remove the connector inside of the dry-rotted but still intact rubber boot.  Wormed my fingers in there, squeezed, and it came apart.  Looks like there was a liberal amount of dielectric grease in there.  Good thing for that.

Untitled

Once the radiator was out, I noticed that the fins along the bottom were like dust.  They rained out all over the place, and it seems that the radiator will need to be replaced.

Untitled

Untitled

The only mystery remaining is that the “second fan” appears to be OEM but I’m not sure what its purpose is.  More pouring through the shop manual is apparently in order.  Also, the bottom radiator mounts were rusted out and just crumbled away.  Those need replacing too.

Untitled

The A/C condenser looks to be in good shape, but the line routing looks a bit hokey.

Untitled

What is the purpose of that big loop on the line going to the condenser? I am considering just pulling all of the A/C crap out for now, since it’s completely discharged anyway. A/C is going to come after the body work, which is still way down the line.

It is going to be a fun project. I’m already thinking about that moment when I fire the engine up and take it for a test drive.

Underneath Inspect/Drain Fluids

Last Thursday I did a little shopping at Harbor Freight and picked up the three shelf service cart, the 1,000 lb engine stand, another oil drain pan, some flarenut wrenches, and some other assorted things.

Last night, I crawled underneath to take a look at everything.  From my untrained eye, there is no unexpected or hidden damage to the suspension and drivetrain components.   There’s some rust here or there, but I think that a good wire brushing, rust conversion, and POR-15 (or equivalent) treatment will mitigate any rusting.

I looked at the axles, the steering rack, the control arms, the engine mounts, etc.  The right CV axle boot has a tear in it, so that axle will be replaced.  There’s a mystery grease on the right side of the transmission which has me concerned as well, but I think it might be grease slung out of the axle boot.

Even the exhaust system does not look like it would be impossible to take apart.  The “spring bolts” that hold the down pipe to the flange that heads aft looks like with enough PBlaster, I’ll be able to take them apart.

The only concern I have is on the unibody structure.  There are two areas that seem to be cut away and rusty, on either side of the car, that worry me.

Since I’m pulling the engine, I decided to move along and follow the shop manual procedure, but also pull the radiator out while I’m at it.  If I’m rebuilding or replacing the engine,  it would be prudent to look at, clean up, and mitigate rust on the entire engine bay and all of its parts.

I removed the plastic splash shield attached to the underside of the front bumper structure and the front crossmember.  It’s in two pieces, and it is clear that some repairs/replacement fasteners were used here.  There’s also a fair amount of abrasion damage to this area, like the front of the car impacted a pile of gravel.  The seller told me this was due to an incompetent towing job.  As I did this, a large quantity of dirt and gravel rained down on my face, even though I tried to prevent that from happening.  Once the shield was off, I had access to the coolant drain plug and other parts.  Everything looks to be pretty much in order, with some rusting here and there.

The transmission draining went fine.  I used my 3/8″ socket wrench and a piece of conduit as a torque amplifier.  The fluid looked clear and normal.

Since this engine has serious internal failure, I inspected the oil pan and see two places where parts punched a hole in it.  I did not see any damage to the block, but I won’t know for sure until it’s out of the car and on the stand.

There was a good quantity of engine oil that drained out when I took the bolt off, and it was black as midnight.  It smelled really bad too.

Finally, I drained the coolant.  I removed the petcock from the bottom of the radiator, and coolant began to dribble out.  I took of the radiator cap and it started gushing out, so I modulated the flow by keeping the cap on partially screwed in.

What I see as a positive is that the coolant drained out clear and greenish yellow.  No “chocolate milk” syndrome, so I’m pretty confident that the coolant and oil was not mixing. It can be reasonably asserted the the engine isn’t failed so that the separation between coolant and oil passages are not breached.

So Saturday night ended with the vital fluids (except for the brakes) drained out of the car. Today I will remove hoses/electrical connections, and get the radiator out.  Time permitting, I’ll move forward from there.


In the garage

The garage was a complete mess, as I have never learned how to keep things uncluttered.      Maybe this project will help in that.

I got the car rolled into the garage and put the front up on jackstands.  The front jack points were rusted out, so I used the floor jack on the front tow hooks, and put the jackstands inboard on the car just aft of the engine.  I think that’s the subframe crossmember, but I’m not sure.  There was no creaking or groaning or deformation.  Some others use the front control arms for the jackstand point.  I think I’ll do same.

There was quite a controversy over on CRXcommunity about this topic.  I learned that I can jack from a point in the center of the car, just behind the front bumper, and get both wheels in the air at once.

So nothing much done on the car other than PB Blastering every nut I might need to take off in the engine compartment, and just poring over the car and matching up what I’m seeing with what I’m reading.

I’ll use the rear tow hook to lift the rear wheels.